Thursday 30 June 2016

Crispy Mathri: A crisp tea time snack

Who doesn't loves Mathri? I do! It is something you can munch it at any time of the day.

So, usually this snack is made of All-purpose flour (Maida), but I believe that it is not much healthy so I make it in my own way.

Ingredients:

 
All-purpose flour (Maida) - 1 cup
Wheat flour- 1 1/2 cup
Sooji (Rava) - 1/2 cup
Black pepper- Freshly grounded
Salt to taste
Cumin powder- 1/2 tbsp
Oil for frying and kneading
Water

Procedure:


ake a large mixing bowl and add the all-purpose flour, wheat flour and sooji in it. Add salt, black pepper and cumin powder in it. To this add around 10 tbsp of oil and mix. A crumbly mixture will be formed, you need to make sure that as you take the mixture in your hands, and it binds together. If it doesn't, add a little more oil and try it again. This is done to make sure that the snack is crispy (khasta) from the inside too. 

Knead the mixture well with water, keep the kneaded flour a little hard and let it set for 10 minutes covered.

Meanwhile, take a utensil for frying and add oil in it. Let the oil heat. 


Cut medium pieces of the flour and flatten them into a not so thin thickness. Prick it with a use of a fork or anything pointed because we don't want them to expand. Sprinkle some flour below if you need. Now, cut out strips of the flour by using a knife or a pizza cutter and put them to fry. The oil should be on high when you put these in, after a minute lower down the heat and let them turn golden brown. Take a frying aid spoon and take them out on an oil soaking paper. 


You can serve these hot with pickle or store them in an air tight container for a lot of weeks once they come to a room temperature.

This snack is the best when you have a cup of tea in your hand and it is raining outside :)


Rajma (Kidney beans) Salad: A colorful and healthy delight

I have been asked often about my sudden weight loss these days by many people. No, its not that I am slim now, but I'm definitely slimmer than what I used to be before my marriage. 

Some months before my wedding, I started going jogging, exercising , dancing and of course changing my eating habits. Its not that I diet till I die. Instead I started decreasing my carb intake.

So, I am sharing one of my favorite home made salad which I and my Mother invented those days.

Ingredients: For 2 servings

Red bell pepper- 1
Yellow bell pepper- 1
Green capsicum- 1
Broccoli- 4-5 mouths
Small Onion- 1
Boiled Kidney beans or Rajma- 1 cup
Vinegar- 5 tbsp
Sugar 3/4 tbsp
Salt and freshly ground pepper

Procedure:

Soak the Rajma (kidney beans) overnight in water. The next day boil them in a cooker for 15- 20 minutes on sim with salt and a pinch of turmeric. Meanwhile blanch the broccoli for 5 minutes after cutting them in the size you want to and drain the water. 

Start chopping the red bell pepper, yellow bell pepper, green capsicum and onion finely. you can also add corn kernels or any other vegetable you want, I like the taste of these veggies only :)

In a small bowl pour the vinegar and add sugar to it and keep it aside to dissolve.

Strain the rajma and keep the excess water aside, you can use it to knead flour or anything else.

Take a mixing bowl and add the Rajma, broccoli, chopped veggies and mix. Add the dissolved mixture of vinegar and sugar and mix again. Now, add salt and freshly ground black pepper according to your taste and give it a final mix.

Serve the salad in a nice plate, you can eat this salad with nachos too.


                                                               Have a healthy cooking!

Tuesday 21 June 2016

Light and Healthy Tomato Soup

Rains are here in Mumbai! What a lovely weather we get to experience. A relief from all the humid summers finally!
What’s better than having a healthy bowl of fresh tomato soup on one of these cozy and breezy days?
Grab down the ingredients and make one yourself. It’s light and will make your tummy smile.

Ingredients:

Servings- 2 (You can add more of the ingredients according to the servings, the list below will give you an idea)
Butter- 1 tbsp.
Oil- 1 tbsp.
Bay Leaf- 1
Black Pepper (Whole)-  4-5
Chopped Garlic- 4-5 (it adds up the Indian flavor)
Chopped Onion- 1
Freshly  Chopped Tomatoes- 5 medium sized
Chopped Carrot- 1 small
Basil or Tulsi finely chopped-  4 leaves
Water- 2 ½ cups
Black pepper powder freshly grounded- ½ tbsp.
Salt to taste
Fresh cream- 1 ½ tbsp.
Fresh Coriander for garnish

Procedure:

Heat oil and butter in a pan. Add bay leaf and whole black pepper. To this, add the chopped garlic and onions and cook till the onions become translucent. Add tomatoes, basil or tulsi, carrots and cook for 2-3 minutes. After that add the water and place a lid on the pan and simmer the fame, you have to let it cook for around 20 minutes. You can remove the lid in between just to check the amount of water in the pan, the vegetables should not stick to the bottom.

Remove the lid and let the mixture cool to the room temperature. I usually put the pan just below a fan to cool it down a little faster. After it comes to a normal temperature, remove the bay leaf from the mixture and blend it in the food processor.

Take a sieve and strain the whole soup through it. Remove the residue and heat the soup again. Add black pepper powder and salt to taste. Pour it in the soup bowl and serve hot.


            For the garnish, add a dash of cream and 2-3 leaves of                 coriander. Pour it in the soup bowl and serve hot with                   soup sticks.


Enjoy a light and healthy relish.

Monday 20 June 2016

Fresh Cherry and Chocolate cake

So, my brother had brought a lot of cherries for us from some place he went to, and as you all know that my husband is not much fond of picking up and eating fresh fruits by his own, I decided to make a fresh cherry and chocolate cake which he loved. Make a note any try this at home to serve your cravings.

Ingredients:

Cake:

All-purpose flour (Maida) - 1 cup (measuring cups) 
Butter or Ghee- 1/3 cup
Sugar- 1 cup
Baking powder- 1 tbsp.
Cocoa Powder- 2 tbsp.
Eggs- 3
Milk: ½ cup
Cherries (remove the seeds and cut them in half)- 1 cup

Buttercream:

Heavy Cream (I used non- dairy whipping cream) - A scoop
Cherries Finely chopped- ½ cup

For the Cake:

Sift together the All-purpose flour, Baking powder and cocoa power three to four times, I usually do this so that all the ingredients mix together really well and keep aside. In a large bowl, mix butter or ghee and sugar together with an electronic blender or mixer. Once the sugar is nearly dissolved in the butter, add eggs one by one and mix. To this, add the sifted mixture of the flour slowly. Make sure that you use the cut and fold technique (mix in one direction) so that there are no lumps or air bubbles formed. If the batter becomes hard, add milk to it and mix again. I used an electronic blender to mix everything together, you can use a spatula if you don’t have one.

Once the batter is ready, mix ¾ of the cherries in it and mix again. If the cherries are a little wet, put them on a tissue paper for a while. You can use a silicon mold for a microwave setting or an aluminum mold for a Gas Tandoor. I used a gas tandoor and set the flame to medium for 15 minutes before putting in the batter. You can glaze the mold and put blotting paper around before putting in the mixture for easy demolding. Put the flame to sim for a perfect moist cake, it would take around 2 to 2 ½ hours for the cake to bake, you can always check with a knife (just put the knife straight inside and pull it back, if it comes clear that means the cake is ready). After ½ hour to 45 minutes, you can put the remaining cherries on the top of the batter so that they don’t drown in. Here, I have not done this because I wanted this to be a surprise from inside.

For the Buttercream:

I have used a non-dairy pack of whipping cream from a cake store nearby. You can simply whip together heavy cream and sugar to form soft peaks. Add cherries and mix the cream. A slight pink color will come to the butter cream because of the cherries.

QUICK TIP:  Fill up only 20% of the utensil you are using for whipping as the cream will rise.


After the cake is fully baked, demold it and cut it into 2 pieces horizontally from the middle. Apply a thick layer of the buttercream on one part of the cake and place the other half on it.


Now, with a spatula cover the whole cake with the remaining buttercream. Sprinkle some chocolate chips and top with some fresh cherries before serving.

Enjoy and stay happy :)


Thursday 9 June 2016

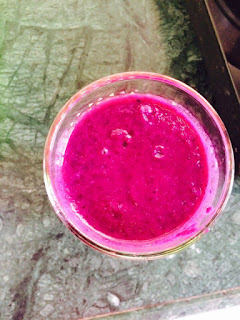
Java Plum and Lychee Juice (The Purple Punch)

Hi, so does everyone has this one person at home who refuses to eat fruits by their own?

Oh, what a coincidence, my dearest hubby is also one of them. So, because I love keeping my refrigerator full of food, I had plenty of fruits waiting to be used.

I tried making a juice combination of lychee and java plum (Jamun) without adding any artificial flavors and it was yum.

So, here is the recipe to the mouthwatering and colorful juice, I call it Purple punch!

Ingredients:                                 

Lychee: 5-6
Java Plum: Around 200 gms.
Water: Half a glass of Chilled water
Black Salt: 1/4th of a tbsp.
Lemon juice: Half a lemon squeezed

Procedure:

Cut the lychees in half and remove the seed from it. In the same way, cut the java plums in half and remove their seeds. Put the pulps of both lychee and java plum in a mixer and add juice of half a lemon in it. Add 1/4th tbsp. of black salt and start the mixer.

After 1 minute of mixing, you will be able to see a thick puree of the fruits. Add some amount of chilled water in the puree according to the thickness you wish for and give it another mix in the mixture.

This juice doesn’t need any sugar or so because of the sweetness of lychees.

Pour the juice as it is in the glasses and enjoy. If you are not much into eating the pulp along, you can sieve the juice so that the extra pulp is separated and you get the perfect juice.


Thank you for visiting here and have a refreshing day J

Tuesday 7 June 2016

Left Over Rice Tikki

Some time ago, I had a few guests visiting my home and I had made so much of food that it got left. the most left over food was Rice. Thankfully, I had made them plain :)

I was thinking of just frying these rice with curd, but my mind has never settled for normal. So,  I just tried something new. I made rice and cheese fritters with mint dip. They turned out to be delicious and heavy, these could be used as a tea time snack on those days when you just want to gobble up some fruits or a bowl of Dal in the dinner.

So here is the recipe:
Ingredients:

Leftover Rice: 1 cup
Besan: 3 big spoons
Bread crumbs: 2 bread
Salt to taste
Garam Masala: half a tbsp
Freshly grinded Black pepper powder
Finely chopped green chilli
Small cubes of Mozzarella cheese
A little Milk accordingly

For the dip:

Mint leaves
Hung Curd: 6 tbsp
Oil: 1 tbsp
Salt

Procedure:

Mix the rice, besan, bread crumbs, salt, garam masala, black pepper powder and chillis in a bowl. If the mixture becomes a little too hard then you can add some milk accordingly to make it a little softer. Make medium sized tikkis from the mixture and give them a shape of a bowl. To those bowl shaped tikkis , put a piece of mozzarella cheese and cover the tikki up. Make sure that you stuff and seal the cheese cube completely.
Now, there are three options to make these mouth watering fritters.
  1. Deep Fry: Heat oil in a Kadhai and fry these tikkis (you can also give them the shape of a ball) untill golden color. Take off the excess oil through a tissue paper and serve hot.
  2. Shallow fry: Take 5 tbsp of oil in a frying pan and heat it. keep the tikkis in the pan and shallow fry them on a low flame till they turn golden in color.
  3. Bake: I have a gas tandoor so you can just heat it a little and apply some oil on the tikkis and bake them until golden, or you can even use a microwave oven for the same. This option is the best for all those calorie cutters.
For the mint dip, wash and clean some mint leaves. To these, add some hung curd, oil and salt to taste and grind them together. You can also add some cream to this.
Serve them hot with the dip and click come pictures too. 


I had my tikkis shallow fried.
You can also add some sort of veggies in the mixture like french beans, corn kernels, carrot or peas.The canvas is all yours, paint it as you like :)